


Kydex Holster Retention Adjustment Guide (2026)
Table of Contents
- Why Kydex Holster Retention Adjustment Matters
- Kydex Holster Retention Screw Adjustment: Step-by-Step
- How to Modify Kydex Holster for Red Dot Sight Clearance
- The Holster Retention Test: Protocols and Pass/Fail Signs
- Weapon-Mounted Lights and Holster Fitment
- Threadlocker and Holster Hardware Maintenance
- Common Mistakes and Safety Checks
- Conclusion
- Frequently Asked Questions
Last Updated: September 12, 2026
Why Kydex Holster Retention Adjustment Matters
Kydex holster retention adjustment is the process of tuning the friction and hardware tension that holds your firearm in place, and getting it right is the difference between a holster you trust and one that sits in a drawer. This guide from Lindahl Holsters walks through every step: locating the retention screw, dialing in tension, testing it properly, and keeping the hardware from backing out over time.
Here's the core tension most guides skip. Too loose, and your pistol can shift or leave the holster during a draw stroke or a run. Too tight, and you fight the holster on every draw, which slows you down and introduces error under stress. Kydex is thermoformed around your specific firearm, so it arrives with a baseline friction fit; the retention screw lets you fine-tune that fit for concealed carry, range use, or duty (kydex.com).
A common mistake is treating retention as a set-and-forget spec. It isn't. Hardware loosens, spacers compress, and a holster that felt perfect in March can feel different by fall. Adjusting takes minutes and costs nothing.
Kydex Holster Retention Screw Adjustment: Step-by-Step
The retention screw controls how tightly the holster shell grips the trigger guard area of your pistol. Turning it changes the clamping force on the shell, which changes how much effort a draw requires. Understanding the hardware stack, not just which way to turn the screw, is what lets you diagnose a holster that won't hold tension.
Locating the Retention Screw and Hardware
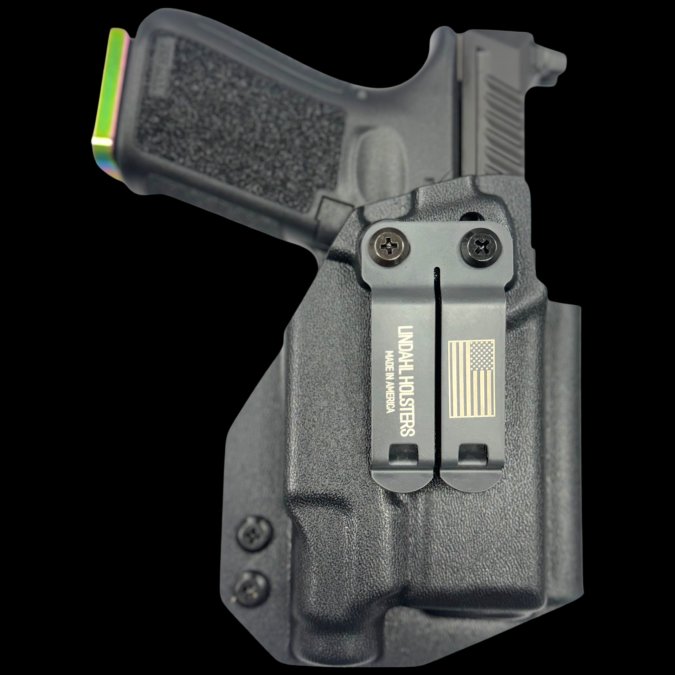
Most Kydex holsters place the retention screw near the trigger guard, often just below the ejection port on the shell's outer face. Some designs use a single screw; others use a pair, one on each side, with a rubber spacer between the shell halves. You'll usually find a Phillips or hex head, and the matching nut sits on the opposite side.
A typical retention assembly is a stack, and knowing the order matters when you reassemble it:
- Screw head on the outer face of the shell
- Outer shell panel
- Rubber or polymer spacer (sometimes called a bushing) between the panels
- Inner shell panel
- Nut or threaded insert on the inside face
The spacer is the part most people overlook. It sets the minimum gap between the two shell panels. When the spacer compresses, cracks, or goes missing, the screw can bottom out before it applies meaningful clamping force, which is why a holster that "won't tighten" often has a spacer problem, not a screw problem.
Before you touch anything, verify the firearm is unloaded and clear. Remove the pistol from the holster. Lay out your tools: the correct driver, a small parts tray, and a light. A magnetic parts tray is worth the few dollars because retention nuts and spacers are small and roll.
Clockwise vs. Counter-Clockwise Rotation
Turning the screw clockwise tightens retention; counter-clockwise loosens it. Make quarter-turn adjustments only, then re-test. A quarter turn can change the feel more than you expect on a tightly molded shell.
- Clockwise: increases clamping force on the trigger guard, harder draw
- Counter-clockwise: reduces clamping force, easier draw
- One full turn in either direction is usually too much at once
Work in small increments and test between each one. If the screw spins freely without changing tension, the spacer or nut may be missing or stripped, which is common on well-used holsters.
Diagnosing Hardware That Won't Hold Tension
When adjustment stops working, the cause is almost always one of four things. Work through them in order:
- Spinning screw with no tension change. The nut is stripped, or the threaded insert has pulled free of the shell. Remove the screw and inspect the nut's threads under good light.
- Screw tightens but tension drifts within a day. The screw is backing out under vibration. This is the classic case for blue threadlocker (covered below).
- Screw bottoms out before tension builds. The spacer has compressed or is missing. Replace it with a fresh spacer of the same thickness.
- Shell flexes visibly when you tighten. You're past the useful range of the screw. Back off and check whether the shell has cracked near the screw hole.
If the shell itself is cracked at the screw hole, stop. No amount of adjustment or new hardware fixes a structural failure, and a holster that flexes at the retention point can release the pistol unexpectedly.

How to Modify Kydex Holster for Red Dot Sight Clearance
Modifying a Kydex holster for red dot sight clearance means removing material from the shell's top edge so the optic doesn't contact the holster during the draw. This is a permanent change, so measure twice.
The right approach depends on your setup. If your holster was molded for an optic-ready configuration, no modification is needed. If it was molded for an iron-sight pistol and you've added a red dot, you have three options:
- Order a holster molded specifically for your pistol and optic combination
- Carefully relieve material with a rotary tool and sanding drum
- Send the holster to a maker for re-molding
Option one is the correct answer for most people. Hand-relieving Kydex is unforgiving: take off too much and you lose retention and holster integrity. If you do modify, mark the clearance line with tape, remove material in small passes, and re-check fitment after every pass. Finish the edge with fine sandpaper so it doesn't catch on the optic or your clothing. Consistent upkeep of these edges ensures your holster remains snag-free, a principle that extends to maintaining tactical gear to ensure reliable performance in the field.
The Holster Retention Test: Protocols and Pass/Fail Signs
A holster retention test is a repeatable check that confirms your pistol stays put during normal movement but releases on a deliberate draw. Run it the same way every time so you can compare results. Most guides tell you to "shake it and see", that isn't a protocol, and it doesn't tell you whether the holster will hold up during a sprint, a climb, or a fall. What follows is a standardized method you can run in two minutes and repeat identically after every adjustment.
Standardized Retention Testing Steps
Run the tests in this order. Each one isolates a different failure mode, so a holster that passes the shake test can still fail the inverted test.
- Confirm the firearm is unloaded and clear, and remove all ammunition from the work area.
- Seat the pistol fully in the holster until you hear the audible click.
- Shake test. Hold the holster upside down over a padded surface and shake firmly for about five seconds. The pistol should stay seated. Any movement at the muzzle end means retention is too loose.
- Inverted hold test. Turn the holster upside down and hold it still, no shaking, for ten seconds. The pistol should not creep out of the holster under its own weight. This catches marginal retention the shake test can mask.
- Draw test. Draw the pistol with your normal draw stroke and note the effort required. You should be able to draw one-handed, from a normal carry position, without bracing the holster with your support hand.
- Re-holster and repeat. Run the full sequence three to five times. Consistency matters more than any single result.
Pass/Fail Criteria
A pass means all three of the following are true:
- The pistol stays seated through the shake test and the inverted hold test
- The draw releases cleanly with one hand and no bracing
- The result repeats across three to five cycles
A fail is any of the following:
- The pistol drops or creeps during the shake or inverted test
- The draw requires a yank, a two-hand brace, or a grip adjustment mid-draw
- Results vary between cycles, sometimes firm, sometimes loose
Retention should feel firm but not forced. If you're gripping the holster with your support hand to draw, it's too tight. If the pistol shifts when you press on the back of the slide, it's too loose.
Why a Standardized Protocol Matters
Retention is a safety property, and safety properties need a repeatable test. A holster that passes a casual shake test at the workbench can still release the pistol during a hard run or a fall if the retention is marginal (nssf.org). Running the same three tests in the same order after every adjustment gives you a baseline you can compare against, and a clear signal when a holster that used to pass starts to fail, which is your cue to inspect the hardware and shell for wear.
Weapon-Mounted Lights and Holster Fitment
Weapon-mounted lights change holster fitment because they widen the pistol's profile below the barrel. A holster molded for a light-bearing setup has a channel for the light body; a holster molded for a bare pistol does not, and the light will prevent full seating.
The fix is a light-bearing holster shell, not a modified standard shell. Retention screws on light-bearing holsters often sit in a different location because the clamping geometry changes. If you swap lights, re-check retention: a different light body means different contact points against the shell.
For appendix carry with a light, the added width matters for comfort and printing. Accessories like the ModWing Concealment Wing Kit rotate the grip toward your body, which helps offset the extra bulk a light adds.

Threadlocker and Holster Hardware Maintenance
Threadlocker is a liquid applied to screw threads that keeps holster hardware from backing out under vibration. Everyday carry, range training, and vehicle travel all introduce vibration, and a loose retention screw means your carefully tuned tension drifts.
Blue medium-strength threadlocker is the right choice for holster hardware (henkel-adhesives.com). It holds under vibration but still allows future adjustment with hand tools. Red high-strength threadlocker is the wrong choice: it can require heat to break the bond, which risks damaging the shell.
Application is simple:
- Remove the screw and wipe the threads clean
- Apply one small drop of blue threadlocker to the threads
- Reinstall and set retention to your preferred tension
- Let it cure before carrying
Keep a spare hardware kit on hand so a stripped screw or lost spacer doesn't sideline your carry setup. Lindahl Holsters stocks blue threadlocker and a replacement hardware kit for exactly this reason.

Common Mistakes and Safety Checks
The most common mistake is over-tightening. A holster that requires real effort to draw slows your draw stroke and invites a poor grip under stress. The second most common is skipping the shake test after adjustment, which means you're carrying on assumption rather than verification.
Other pitfalls worth naming:
- Adjusting retention with the firearm loaded
- Using red threadlocker and locking the screw permanently
- Relieving Kydex by hand without a clearance plan
- Ignoring holster wear and tear around the screw holes and shell edges
- Assuming a holster molded for one light will fit another
Holster wear and tear is the slow failure mode. Cracks at screw holes, rounded shell edges, and stretched spacers all reduce retention over time. Inspect the shell monthly. The IWB standard belt clip is another wear item worth replacing before it fails.
Conclusion
Retention tuning is a maintenance habit, not a one-time task, and the payoff is a carry setup you actually trust. Lindahl Holsters builds custom Kydex holsters with adjustable retention, durable finishes, and hardware designed to stay put, plus a military, law enforcement, and first responder discount program and free shipping on orders over $125. Find your gun model and get a holster molded for your exact firearm, optic, and light setup.
Frequently Asked Questions
How tight should retention be on a Kydex holster?
A properly adjusted Kydex holster should hold the firearm securely when inverted and shaken, but release cleanly on a deliberate draw stroke. Test by holstering an unloaded firearm, turning the holster upside down, and giving it a firm shake. The gun should not fall out. If it drops free, tighten the retention screw clockwise a quarter turn and retest. The goal is a secure fit that still allows a smooth, consistent draw.
What tools are needed to adjust Kydex holster retention?
Most Kydex holsters use a Phillips head or hex screw for retention adjustment. You will need the matching screwdriver or hex key, a clean work surface, and an unloaded firearm for testing. A small drop of blue threadlocker medium strength helps keep the screw from backing out during everyday carry. Lindahl Holsters offers a replacement hardware kit and blue threadlocker if you need spare parts or want to secure your adjustment.
Do you have to break in a Kydex holster?
Kydex holsters do not break in the way leather does. Kydex is thermoformed and holds its shape, so retention is controlled by the adjustment screw, not by wear. If your holster feels too tight when new, loosen the retention screw slightly rather than forcing the firearm in and out. Over time, the holster shell may show minor wear, but the fit should remain consistent as long as the hardware stays tight.
Can you make a Kydex holster tighter?
Yes. Turn the retention screw clockwise in small increments, usually a quarter turn at a time, and test the fit after each adjustment. Insert an unloaded firearm, check that it seats fully with an audible click, then invert the holster and shake gently. If the firearm stays put, the retention is set. If it still feels loose, repeat the quarter-turn adjustment until you reach the desired tension.

