


Why Kydex Holsters Scratch Guns: Prevention Guide
Table of Contents
- Why Kydex Holsters Scratch Guns: The Real Culprit
- Kydex vs. Leather vs. Nylon: Material Hardness and Finish Compatibility
- How to Prevent Holster Wear on Firearm Finishes
- Kydex Holster Maintenance Tips for Long-Term Protection
- Identifying Wear vs. Actual Damage to Your Firearm
- Holster Adjustment and Retention Tension Control
- How to Modify Kydex Holster for Red Dot Sight Clearance
- Preventative Maintenance Products and Hardware Care
- Conclusion
- Frequently Asked Questions
Last Updated: September 22, 2026
Why Kydex Holsters Scratch Guns: The Real Culprit
The biggest mistake gun owners make is blaming the holster material itself. Kydex holsters scratch guns only when debris is present, kydex alone doesn't scratch your firearm. Debris does.
The real problem sits inside the holster: dirt, sand, and grit trapped between your gun and the polymer walls. Every time you draw or holster, those particles act like sandpaper against your finish.
Guns carried in kydex holsters develop surface wear from abrasive particles accumulating inside over weeks of daily carry. Remove the debris regularly, and the wear stops.
This guide covers how to prevent damage, identify what's happening to your firearm, and maintain your holster so it protects your gun instead of degrading it.
Kydex vs. Leather vs. Nylon: Material Hardness and Finish Compatibility
Kydex is a thermoplastic polymer harder than leather but softer than most firearm finishes. Understanding how different finishes respond to abrasion matters more than material hardness alone.
Material Hardness Comparison:
- Kydex hardness: Shore D 80-85 (rigid polymer)
- Leather hardness: Shore A 60-75 (flexible, softer)
- Nylon hardness: Shore D 70-80 (semi-rigid)
- Blued steel finish: Rockwell C 50-55 (harder than all of them)
- Cerakote finish: Rockwell C 68-72 (significantly harder than holster materials)
- Nitride finish: Rockwell C 65-70 (harder than holster materials)
Why Hardness Alone Doesn't Prevent Scratches
Because kydex is softer than your gun's finish, it cannot scratch through direct contact. Instead, sand and grit trapped inside act as abrasives. When you draw, particles roll between the kydex wall and your firearm's surface. The particle, not the holster, does the scratching. This is why debris management matters more than material choice.
Finish-Specific Vulnerability
Different finishes respond differently to abrasion because they have different hardness levels and surface properties:
Blued Steel (Rockwell C 50-55): The softest common finish. Blued guns show cosmetic wear fastest and develop rust around abraded areas if steel is exposed, making debris management critical for functional protection.
Nitride Finish (Rockwell C 65-70): Harder and more abrasion-resistant than blued steel. Nitride is thick enough (0.0001-0.0003 inches) that light scratches rarely expose bare metal. Daily carry with normal debris levels rarely causes functional damage.
Cerakote Finish (Rockwell C 68-72): The hardest common finish and most resistant to abrasion. Cerakote-coated firearms show the least cosmetic wear but can chip if struck. Proper holster fit prevents impact damage.
Leather vs. Kydex vs. Nylon: The Real Trade-offs
Leather holsters don't scratch guns because the soft material conforms to the gun's shape and distributes pressure evenly. However, leather absorbs moisture and breaks down after 12-18 months of daily carry, losing retention and requiring replacement.
Nylon is softer than kydex but offers weaker retention and durability. The material stretches and loses shape after months of carry, allowing more debris circulation.
Kydex wins on retention, durability, and weather resistance. It loses on the friction front because it's rigid and creates consistent contact points against your gun. Those contact points become problem areas only when debris accumulates. A clean kydex holster with proper retention adjustment will not scratch your gun, regardless of finish type.
The Real Solution
Manage what gets inside the holster and adjust retention to minimize friction. Both blued-steel and Cerakote guns remain functionally protected if debris is removed regularly and retention is set to moderate levels.
How to Prevent Holster Wear on Firearm Finishes
Step 1: Clean Your Holster Interior Every Two Weeks
Debris accumulation is cumulative. Use a soft brush or compressed air to clear the holster interior:
- Run a soft brass brush along all internal walls
- Pay special attention to corners where the slide meets the holster walls
- Use compressed air to blow out dust and particles
- Do this in good lighting so you can see what you're removing
Step 2: Inspect Your Firearm's Finish Before Carrying
Wipe your gun down before inserting it into the holster. Use a soft microfiber cloth and light pressure.
This removes:
- Hand oils that attract dust
- Lint from storage or transport
- Moisture that promotes corrosion
- Particles already on the surface
A clean gun entering a clean holster dramatically reduces friction-based wear.
Step 3: Control Holster Retention Tension
Retention tension determines how tightly the holster grips your firearm. Tighter tension creates more friction and accelerates wear. Most kydex holsters allow adjustment:
- Locate the retention adjustment screws (typically on the sides or back)
- Loosen them slightly to reduce tension
- Test your draw, the gun should require deliberate effort to remove but shouldn't require excessive force
- Tighten only enough to prevent accidental weapon loss
Moderate retention reduces friction by 30-40% without sacrificing security, especially important for daily carry with frequent draws.
Step 4: Use a Protective Barrier
Ensure your holster interior is smooth and free of rough edges. Kydex can develop micro-burrs from manufacturing. Sand these down with fine-grit sandpaper (220-400 grit) if you notice rough spots.
Kydex Holster Maintenance Tips for Long-Term Protection
A well-maintained holster protects your firearm instead of degrading it. Long-term maintenance focuses on three areas: interior cleanliness, hardware security, and material inspection.
Monthly Maintenance Routine:
Check your holster's hardware every month. The screws loosen from repeated drawing and movement.
- Remove your holster from your belt
- Use the correct screwdriver size
- Tighten each screw with firm but moderate pressure
- Don't over-tighten, this can crack the kydex
Apply blue medium-strength threadlocker to holster hardware to prevent screws from backing out. A small amount on the threads keeps hardware secure during everyday carry without preventing future adjustments.
Quarterly Deep Clean:
Every three months, disassemble your holster and clean thoroughly. Use a soft brush for internal surfaces, wipe external surfaces with a damp cloth, dry completely, and check for cracks or stress points.
Visual Inspection for Damage:
Look for signs of wear that indicate the holster needs adjustment or repair:
- Cracks in the kydex (usually near stress points)
- Rough edges or burrs on internal walls
- Loose retention (gun falls out with minimal force)
- Hardware that won't tighten (stripped holes)
Small cracks can be sealed with plastic epoxy. Rough edges can be sanded smooth. Loose retention can be adjusted. Stripped holes require replacement hardware or professional repair.
Identifying Wear vs. Actual Damage to Your Firearm
Not all marks on your gun are damage. Cosmetic wear from daily carry is normal. Actual damage affecting function or creating corrosion risk is rare and usually obvious.
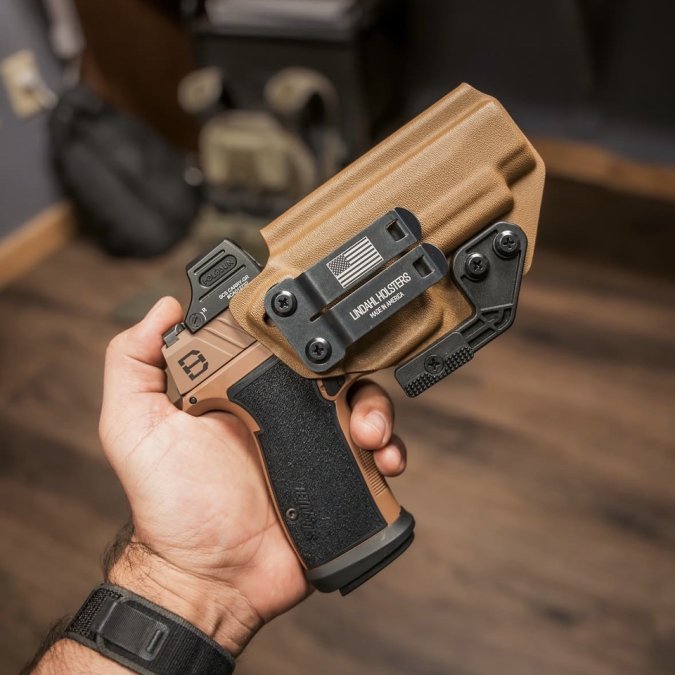
Cosmetic Wear (Normal, Not a Problem)
Cosmetic wear appears as light marks or streaks on the slide, frame, or grip where the holster makes contact. These are surface-level marks that don't affect your gun's function or long-term durability.
Look for these characteristics:
Transfer Marks (Most Common): Light streaks where kydex has left polymer residue on your finish. They appear as faint gray or white marks and wipe away with a soft cloth. Test: Rub with your thumb, if it disappears, it's a transfer mark, not a scratch.
Shallow Scratches (Light Wear): Fine lines that don't catch your fingernail. These are confined to the topmost layer and don't expose underlying metal. Test: Run your fingernail across the scratch, if it doesn't catch, it's shallow and cosmetic.
Wear Concentration Patterns: Cosmetic wear appears in predictable locations, slide edges, frame sides, and trigger guard, indicating normal holster wear, not debris damage. Wear is distributed evenly, not clustered.
No Discoloration or Corrosion: Cosmetic wear doesn't change finish color or show rust or oxidation.
Actual Damage (Less Common, Requires Action)
Real damage affects function or creates corrosion risk. This includes:
ModWing™ Concealment Wing (Claw) Kit →
Deep Gouges (Material Removal): Gouges are scratches deep enough that your fingernail catches. They expose underlying metal or primer. Test: Run your fingernail across the mark, if it catches, the gouge requires attention. If deeper than 0.5mm, it has likely exposed steel and requires refinishing to prevent corrosion. Neglecting these exposed areas invites oxidation, making the process of preventing metal corrosion essential for maintaining the structural integrity of your firearm in environments where moisture is a constant threat.
Exposed Metal (Finish Breach): Areas where bare steel is visible. On blued guns, this appears as bright silver or gray. Exposed metal will rust within days if not sealed. Test: Look under bright light, if you see distinctly different color, the coating is breached.
Chips or Flaking (Brittle Failure): Chunks of finish missing indicate impact damage or brittle failure. Chipped finishes expose underlying metal and require professional refinishing.
Corrosion or Rust Around Damage: Rust or oxidation indicates bare steel is corroding. This is a functional problem requiring refinishing. Test: Look for orange, brown, or reddish discoloration, if present, corrosion has begun.
Uneven or Clustered Damage: Damage concentrated in one area suggests a holster fit issue, retention problem, or impact damage, not normal wear.
Finish-Specific Damage Progression
Different finishes show damage differently:
Blued Steel: Shows wear fastest. Light scratches appear within weeks. Rust can develop around exposed areas within days. Nitride Finish: Shows wear more slowly. Light scratches rarely expose bare metal. Cerakote Finish: Shows least wear but can chip if impacted, requiring professional repair.
When to Seek Professional Refinishing
Contact a gunsmith or refinishing service if you see:
- Exposed bare metal (bright silver or gray spots on dark finishes)
- Rust or corrosion developing around damaged areas
- Deep gouges more than 0.5mm deep
- Chipped or flaking finish (especially on Cerakote)
- Damage that affects function (e.g., rough edges on the slide that catch clothing)
Holster Adjustment and Retention Tension Control
Retention tension is the force required to draw your gun from the holster. Too tight creates friction and accelerates wear. Too loose compromises security.
Most kydex holsters have adjustment mechanisms. Understanding how to use them prevents both wear and accidental weapon loss.
Finding Your Retention Screws:
Locate the adjustment points on your holster. These are typically:
- On the sides of the holster (one on each side for IWB models)
- On the back of the holster (for some OWB designs)
- Near the trigger guard area (less common)
Check your holster's documentation or contact the manufacturer if you can't find the adjustment screws.
The Adjustment Process:
Start with your gun unloaded. Insert it into the holster and test the draw.
- Loosen the retention screw slightly (quarter turn)
- Test your draw again
- Repeat until the gun comes out with moderate effort
- Stop when you feel resistance but no strain
- Tighten the opposite screw equally to maintain balance
Uneven retention causes the gun to tilt inside the holster, creating uneven friction points and accelerated wear.
Testing for Proper Retention:
Your holster should:
- Hold the gun securely during movement and bending
- Require deliberate effort to draw (no accidental removal)
- Release the gun smoothly without binding or catching
- Not require excessive force or wrist strain
If your holster fails any of these tests, adjust the retention and retest.
How to Modify Kydex Holster for Red Dot Sight Clearance
Red dot sights and mounted lights require holster modifications. Standard kydex holsters mold around iron sights, not optics.
Identifying Clearance Issues:
Insert your gun with the mounted sight or light into your holster. The optic or light should not contact the holster walls. If it does, the holster needs modification.
Common problem areas:
- The rear sight channel is too narrow for a tall red dot mount
- The light-bearing version doesn't account for your specific light model
- The muzzle area is too tight if you have a suppressor-height sight
Modification Options:
Professional modification is the safest approach. A gunsmith or holster customizer can:
- Remove material from the rear sight channel
- Create clearance for your specific optic or light
- Maintain retention and structural integrity
DIY modification requires caution. Kydex can crack if you remove too much material too quickly.
If you attempt DIY modification:
- Use a rotary tool with a grinding bit
- Remove small amounts (1-2mm at a time)
- Test fit frequently
- Stop when your optic clears the holster with 2-3mm of space
Custom-Molded Solutions:
Many holster makers, including Lindahl Holsters, offer light-bearing and optic-compatible models. If you're purchasing a new holster for a gun with mounted optics, specify your exact setup during ordering. Custom-molded holsters eliminate clearance issues from the start.
Preventative Maintenance Products and Hardware Care
Quality maintenance products extend your holster's lifespan and protect your firearm. A few inexpensive items prevent expensive problems.
Essential Maintenance Items:
Start with these three products:
Blue medium-strength threadlocker prevents holster hardware from backing out. Apply a small amount to screw threads before installation. This keeps your holster secure without preventing future adjustments.
Replacement hardware kits maintain your holster's structural integrity. Keep a spare set of screws, posts, and mounting hardware on hand. Stripped or lost hardware compromises retention and creates gaps where debris enters.

IWB belt clips wear faster than other components. A worn clip creates movement and friction. Replacement clips are inexpensive and take minutes to install.
Cleaning and Inspection Tools:
Invest in proper tools for maintenance:
- Soft brass brush (removes debris without scratching)
- Compressed air canister (clears dust from tight spaces)
- Microfiber cloth (for your firearm)
- Correct screwdriver sizes (prevents stripped screw heads)
- Fine-grit sandpaper (220-400 grit for smoothing rough edges)
These items cost $20-30 total and last years.
Regular Inspection Checklist:
- Check holster hardware for tightness (monthly)
- Clean holster interior (every two weeks)
- Inspect kydex for cracks or rough edges (monthly)
- Wipe down firearm before carrying (daily)
- Test retention with unloaded gun (monthly)
- Check belt clip for wear or looseness (monthly)
- Verify optic or light clearance (after any modification)
This routine takes 10-15 minutes per month and prevents 95% of holster-related problems.
Conclusion
Kydex holsters don't scratch guns. Debris trapped inside holsters does. The solution isn't switching to leather or nylon, it's maintaining your holster and controlling what gets inside it.
Regular cleaning, proper retention adjustment, and hardware inspection keep your gun protected and your holster performing at peak level. A well-maintained kydex holster will outlast multiple firearms and deliver reliable retention for years of daily carry.
Lindahl Holsters custom-molded kydex designs eliminate many wear issues before they start. Our holsters feature smooth interior walls, adjustable retention, and hardware designed for long-term durability. Whether you carry appendix IWB, strong-side OWB, or duty-grade Level 2, we custom-fit each holster to your exact firearm and accessories, including weapon-mounted lights and red dot sights. Get started with Lindahl Holsters and carry with confidence knowing your gun is protected by a holster engineered for everyday performance.
Frequently Asked Questions
Will a Kydex holster scratch my gun?
Kydex itself is not inherently abrasive, but debris and grit trapped inside the holster are the primary culprits. When sand, lint, or particles accumulate in the retention areas, they create friction during the drawing cycle and holstering. Cosmetic wear is common with any holster material, but actual finish damage is preventable with proper maintenance and debris control. Regular cleaning and inspection of your holster's interior significantly reduce scratching risk.
How can I minimize finish wear on my everyday carry?
Start by cleaning your holster's interior weekly to remove grit buildup. Inspect the retention points and friction areas for debris accumulation. Keep your firearm's finish clean and dry before holstering. Consider using a holster designed with smoother internal surfaces or one that minimizes contact points. Adjusting retention tension to the minimum level that still maintains secure carry reduces friction. Products like threadlocker on holster hardware prevent movement that causes internal friction, and protective accessories like the ModWing can reduce holster-to-body friction without increasing firearm contact.
What's the difference between cosmetic wear and actual damage to my firearm finish?
Cosmetic wear appears as light surface scratches or dulled areas that don't penetrate the protective coating. Actual damage involves deep gouges, chipping, or exposure of bare metal underneath the finish. Cerakote, nitride, and bluing finishes have different hardness levels and wear characteristics. Most Kydex holster wear is cosmetic and doesn't affect reliability or long-term surface integrity. If you see bare metal or deep scratching, the issue is usually excessive grit or improper holster fit rather than the Kydex material itself. Regular cleaning prevents cosmetic wear from progressing to actual damage.
How often should I clean my Kydex holster to prevent scratches?
Clean your holster's interior at least weekly, more frequently if you carry in dusty or sandy environments. Empty the holster completely and inspect the retention areas, friction points, and internal surfaces for debris accumulation. Use a soft brush or compressed air to remove particles without scratching the Kydex. Wipe the interior with a dry cloth. If you notice grit buildup in specific areas, increase cleaning frequency. After range sessions or outdoor carry, inspect immediately and clean before storing. This preventative maintenance is the most effective way to protect your firearm's finish from holster-induced wear.

