


How to Adjust Holster Cant: A Complete Guide
Table of Contents
- What Is Holster Cant and Why It Matters
- Forward Cant vs. Reverse Cant vs. Neutral Cant Explained
- Tools and Hardware You'll Need
- Step-by-Step: How to Adjust Cant on Your Holster
- Holster Retention Adjustment Guide: Finding the Right Balance
- Best Cant Angle for Appendix Carry
- How to Modify Kydex Holster for Red Dot Sight Clearance
- Adjusting Ride Height vs. Cant: What's the Difference
- Common Mistakes to Avoid When Adjusting Cant
- Troubleshooting Common Adjustment Issues
- Frequently Asked Questions
Last Updated: September 19, 2026
What Is Holster Cant and Why It Matters
Holster cant refers to the angle at which your firearm sits in the holster relative to a vertical surface, and learning how to adjust holster cant is essential for optimizing your carry setup. This angle directly affects your draw speed, concealment, and overall carry comfort. Understanding cant is essential for anyone carrying concealed or wearing a duty holster.
The cant angle controls how your grip aligns with your body when you draw, affecting both draw speed and concealment.
There are three main cant positions: forward cant, reverse cant, and neutral cant. Each serves different purposes depending on your carry method, body shape, and draw preference. Getting this right transforms how your holster feels during daily carry.
Forward Cant vs. Reverse Cant vs. Neutral Cant Explained
Forward cant tilts the grip toward your body with the muzzle pointing downward and back. This works well for appendix carry and strong-side IWB holsters because it naturally aligns with your arm's reach.
Reverse cant tilts the grip away from your body with the muzzle pointing upward and forward. Law enforcement and duty holster users often prefer it because the grip comes up faster and more naturally toward the shooting hand.
Neutral cant keeps your firearm perfectly vertical and works for shooters who switch between carry positions, though it's rarely optimal for any single carry method.
Body type influences cant choice: shorter torsos favor forward cant, broader shoulders favor reverse cant, and versatility seekers prefer neutral cant.
Tools and Hardware You'll Need
Essential tools:
- Phillips head screwdriver (most common for holster screws)
- Flathead screwdriver (for some belt clip styles)
- Protractor or angle guide (optional but helpful for measuring)
- Blue medium-strength threadlocker (prevents screws from backing out)
Your holster's attachment points, where the belt clip connects to the holster body, are the pivot points you'll adjust. Most IWB holsters use two screws or posts.
The Lindahl Holsters [Replacement Hardware Kit(/products/lindahl-holsters-replacemnt-hardware-kit) | lindahlholsters.com] includes replacement screws and posts if you lose or strip yours during adjustment. Having backup hardware prevents delays when you need to fine-tune your setup.
Some holster clips offer built-in cant adjustment. The DCC Monoblock and Ulticlip UltiTuck both feature dual mounting slots that let you change cant without removing your holster from your belt.
Step-by-Step: How to Adjust Cant on Your Holster
Step 1: Identify Your Current Cant Angle
Start by measuring your current cant angle. Draw a vertical line on a wall or use a level. Hold your holster against the line and note how far the grip leans forward or back. You can estimate in degrees (0 degrees is neutral, positive degrees forward, negative degrees back) or simply describe it as "slightly forward" or "leaning back."
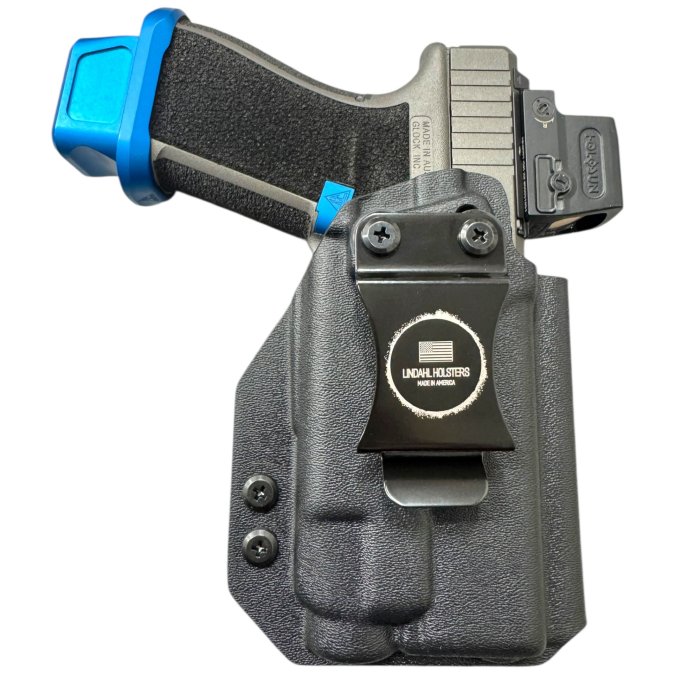
Step 2: Loosen the Attachment Points
Locate the screws or posts that hold your belt clip to the holster body. Using your Phillips head screwdriver, loosen both screws by turning counterclockwise about one-half turn, this is the first step to adjust holster cant properly. The clip should move freely but still hold the holster when you lift it. Loosen them evenly so the clip rotates smoothly without binding.
Step 3: Rotate to Your Target Angle
Gently rotate the belt clip to your desired cant angle. Most appendix carriers prefer 15-20 degrees forward cant, strong-side carriers prefer 0-10 degrees forward or neutral, and duty holster users often run 5-15 degrees reverse cant. Hold the clip at your target angle and tighten one screw slightly. Draw your firearm slowly, the grip should come up naturally. If not, loosen and adjust again.
Step 4: Secure and Test
Once you've found your angle, tighten both screws firmly with moderate pressure. Apply blue medium-strength threadlocker to each screw and let it cure for 24 hours before carrying. Test your draw at least 20 times, it should feel smooth and natural with the grip coming up at the same angle every time.
Holster Retention Adjustment Guide: Finding the Right Balance
Retention and cant work together to create a safe, functional carry system. Retention refers to how firmly your holster grips your firearm, it should hold securely during movement but release immediately when you grip to draw. When you adjust cant, you change how your hand approaches the grip, which affects the retention force needed. Forward cant makes the grip more accessible, so you may need slightly less retention. Reverse cant makes the grip harder to reach, so retention can be firmer.
Most Kydex holsters include adjustable retention screws on the holster body, separate from your cant adjustment screws. Test retention by holding your holster upside down and shaking it gently, your firearm should not fall out. Then grip your gun and try to draw, it should come free with moderate pressure.
Best Cant Angle for Appendix Carry
Appendix carry places your firearm in the front of your waistband, typically between 12 and 3 o'clock on your belt. Forward cant aligns your grip with your natural arm angle, creating the fastest, most natural draw. However, the ideal angle varies significantly based on your body type and torso proportions.
Body Type and Cant Correlation
Shorter torso (under 5'6") with average or narrow shoulders: You likely benefit from 20-30 degrees forward cant. A shorter torso means your appendix position sits higher relative to your arm's natural reach angle. More forward cant compensates by tilting the grip toward your body, making the draw feel natural without excessive wrist bend. Test starting at 25 degrees.
Average torso (5'6"-5'10") with average shoulder width: Most appendix carriers in this range find 15-20 degrees forward cant optimal. This is the "middle ground" angle that works across most body types. Start here if you're unsure of your ideal angle. Your arm's natural reach angle aligns well with a moderate forward cant without requiring extreme grip positioning.
Tall torso (over 5'10") or broad shoulders: You may prefer 10-15 degrees forward cant or even neutral (0 degrees). A longer torso means your appendix position sits lower relative to your arm's reach. Less forward cant prevents your wrist from bending excessively upward during the draw. If standard appendix cant feels awkward, try reducing the angle by 5 degrees.
Heavier build or higher belly carry: If you carry higher on your abdomen due to body shape, increase forward cant to 20-25 degrees. A higher carry position naturally places the grip farther from your hand's resting position. More forward cant closes that gap and keeps your draw smooth. Also test slightly higher ride height (1.5-2 inches above belt) to account for the geometry change.
Athletic or lean build: You have more flexibility in cant angle choice. Most athletic carriers find 15-20 degrees forward cant works well, but some prefer as little as 10 degrees because their body geometry is more uniform. Test the standard range first, then adjust based on draw feel.
Testing Your Ideal Appendix Cant
Stand in your normal posture wearing the holster and grip your holstered firearm without moving your arm. Your hand should land naturally on the grip without your wrist bending. If your wrist bends upward, your cant is too forward, reduce it. If it bends downward, increase it. Draw slowly 10 times at each cant angle, a correct cant angle feels effortless.
Concealment and Cant Interaction
Forward cant helps hide your firearm under a t-shirt because the grip tucks tighter against your body. However, if your cant is too aggressive, the muzzle may print at the bottom of your shirt. The goal is the minimum forward cant that still gives you a natural draw, this maximizes concealment while maintaining speed.
How to Modify Kydex Holster for Red Dot Sight Clearance
Red dot sights add height to your firearm, and a holster designed for iron sights may not have enough clearance. Lindahl Holsters specializes in custom Kydex holsters designed to accommodate specific weapon-mounted lights and optics, specify your red dot model when ordering. If you already own a holster, you can modify it carefully by heating the Kydex with a heat gun at low temperature (6-8 inches away, moving slowly) and gently pressing it away from the optic contact point. Let it cool completely before testing. This works best for small optics; large red dots may require professional modification or a new holster.
Adjusting Ride Height vs. Cant: What's the Difference
Ride height controls how high your firearm sits on your belt (measured from belt to top of slide), while cant controls the angle. These are separate adjustments. To adjust ride height, move your belt clip up or down on the holster body using different mounting holes. To adjust cant, rotate your belt clip without changing which hole it attaches to. Most IWB carriers prefer 0.5-1.5 inches above the belt, appendix carriers prefer 1.0-2.0 inches, and duty holster users often run higher ride height for faster access.
Common Mistakes to Avoid When Adjusting Cant
Common mistakes: (1) adjusting cant without loosening screws fully, forcing a tight clip strips threads; (2) over-tightening screws after adjustment, use moderate pressure only; (3) adjusting cant without testing at the range, test with at least 20 practice draws; (4) changing cant without adjusting retention, test retention after every cant change; (5) using the wrong screwdriver, Phillips screws need a proper Phillips driver; (6) forgetting threadlocker, apply blue medium-strength threadlocker to every screw after final adjustment.
Troubleshooting Common Adjustment Issues
Adjustment problems usually fall into three categories: hardware failure (stripped threads, broken screws), mechanical binding (clip won't rotate smoothly), and performance issues (cant keeps changing, draw feels wrong). Understanding the root cause prevents repeat failures.
Hardware Failure Issues
Problem: Screw won't tighten after adjustment.
This indicates stripped threads in either the holster body or the screw itself.
Root cause: Over-tightening during a previous adjustment, using the wrong screwdriver size, or manufacturing defect.
LINDAHL HOLSTERS REPLACEMNT HARDWARE KIT →
Solution: Replace the screw with a new one from a replacement hardware kit. If the holster body threads are stripped, drill out the hole slightly and use a larger-diameter screw, or use a threaded insert kit designed for Kydex repair.
Prevention: Use a properly fitting Phillips head screwdriver and tighten with moderate pressure only. Apply blue medium-strength threadlocker to every screw after final adjustment.
Problem: Screw breaks off inside the holster.
A screw that breaks off has failed under tension, usually from over-tightening or being tightened after threads were already partially stripped.
Solution: Extract the broken screw using a screw extractor tool or locking pliers, then replace with a new screw and apply threadlocker.
Prevention: Stop tightening immediately if you feel resistance. Loosen, inspect, and replace hardware rather than forcing it.
Mechanical Binding Issues
Problem: Clip rotates too easily after tightening, or won't stay at your desired angle.
This means the screws are not tight enough or the threads are partially stripped.
Solution: Tighten both screws a quarter turn more. If the clip still rotates freely, replace the screws and/or the clip. Some holster clips have oversized mounting holes; you may need a clip with tighter tolerances or a different holster model.
Problem: Clip won't rotate smoothly; it binds or sticks at certain angles.
Binding indicates the clip is not pivoting freely around the screw.
Solution: Loosen both screws completely and try rotating the clip by hand. If it still binds, the clip is warped, try gentle heat (using a heat gun at low temperature, 6-8 inches away) to reshape it around the mounting holes. If it rotates freely when fully loose, the screw is bent or holes are misaligned, replace the screw or seek professional repair.
Performance Issues After Adjustment
Problem: Cant angle keeps changing during the day.
Your screws are backing out from vibration and movement.
Solution: Remove the screws, apply blue medium-strength threadlocker to the threads, reinstall, and let cure for 24 hours before carrying. This is essential maintenance. Check your screws weekly during the first month of carry, then monthly.
Problem: Draw feels awkward or slow after cant adjustment.
Your new cant angle may not match your body type, carry position, or draw style.
Solution: Test drawing 20 times slowly at your new cant angle. If it still feels wrong after a week of practice, adjust the cant back toward your previous angle in small increments (2-3 degrees at a time). Test 20 draws at each increment until your draw feels smooth and natural.
Problem: Holster scratches your slide after cant adjustment.
The Kydex may have shifted during rotation and now contacts your slide in a new location. Alternatively, the holster may have warped slightly during adjustment.
Root cause: Kydex shifted during clip rotation, or heat from friction during adjustment caused minor warping.
Diagnosis: Inspect the contact point on your slide. If you see a new scratch or scuff mark, note its location. Loosen the screws and rotate the clip back slightly. Retighten and test. If scratching stops, you've found the problem.
Solution: If scratching continues after adjustment, the holster may need professional reshaping. Some Kydex holsters can be carefully heated and reshaped to eliminate contact points, but this requires skill. If you're not comfortable with heat-shaping, contact the holster manufacturer for repair or replacement options.
Problem: Retention feels too loose after cant adjustment.
Forward cant makes the grip more accessible, which can feel like loose retention. However, loose retention is a safety issue and must be addressed.
Root cause: Your cant adjustment changed how your hand grips the firearm, which changed the angle at which the holster's retention features engage. Alternatively, your retention screws may have loosened.
Diagnosis: Hold the holster upside down and shake it gently. Your firearm should not fall out. If it does, retention is genuinely too loose. If your gun stays in but feels loose only during draw, you've simply gotten faster at drawing, this is not a problem.
Solution: If your gun falls out when the holster is inverted, tighten the retention screw (this is separate from your cant adjustment screws) by a quarter turn. Test again. Repeat until your gun stays in during the inversion test but still draws smoothly. If retention screws are already tight and your gun is still falling out, the holster's retention mechanism may be damaged and need replacement.
Frequently Asked Questions
What does cant mean on a holster?
Cant refers to the angle at which your holster sits on your body relative to vertical. A holster with forward cant tilts the grip away from your body, while reverse cant tilts it toward your body. Neutral cant means the holster sits straight up and down. The cant angle directly affects draw speed, concealment, and comfort during daily carry. Most holsters allow 0 to 15 degrees of adjustment in either direction.
Does holster cant affect draw speed?
Yes. Forward cant typically improves draw speed because it positions the grip closer to your hand and reduces the distance your arm must travel. Reverse cant may slow your draw slightly but can improve concealment for appendix carry positions. The optimal cant depends on your carry method, body type, and grip angle. Experimenting with small adjustments helps you find the balance between speed and concealment.
What is the best cant angle for appendix carry?
Appendix carry typically works best with 15 to 30 degrees of forward cant, which positions the grip at a natural angle for your hand position when carrying at the front waistline. Some shooters prefer slight reverse cant (5 to 10 degrees) for deeper concealment. Your body type, belt position, and clothing fit all influence the ideal angle. Start with 15 degrees forward and adjust in 5-degree increments until you achieve a comfortable draw and minimal printing under your shirt.
How do I know if my holster cant is set correctly?
Test your cant by performing several dry draws from your normal carry position. Your hand should reach the grip naturally without excessive wrist rotation. Check concealment by looking in a mirror while wearing your typical clothing. The holster should sit tight to your body without printing. If you're struggling to access the grip or the holster is shifting during movement, adjust the cant by 5-degree increments and retest. Proper cant feels intuitive and requires minimal adjustment of your arm position during the draw.

